Monday, September 10, 2012

How to import voucher codes from external file


Anyone, who has started an advertising campaign in own online store knows, that voucher codes are awesome tool for increase sales and income. Very often we want to organize actions in other webpages like livingsocial, groupon, mydeal etc. and we get listed special codes form this sites.  Customer after buying there some stuff gets one idividual code from voucher codes list. We must add all of listed vouchers to our shop system, but there is a little problem: what to do when there are hundred of codes on list?


How does it looks in Prestashop system?

In prestashop we can generate one voucher code per one request. It's problematic, because we spend much time in back office, only for adding voucher codes. Moreover, it is really tedious.  Simple measures say that the addition of about 100 discount codes with advanced specification take about 5 hours!  It's ridiculous to spend 5 hours on adding a discount code in prestashop back office. All of this is by the fact that we can't import voucher codes from files in Prestashop back office. But we create a special module:  Import Voucher from CSV .  Our module can import a thousand codes listed in some file (CSV or other).


Ok, so how to import many voucher codes in prestashop?

First we need to describe the basic functionality of this module. Module Import Voucher Codes form CSV  is the simplest and quickest way to add as many voucher codes from CSV file as you want by one mouse click! Import Vouchers From CSV module saves your time which you can spend to make more money. If you want this module, go to  Import Vouchers from CSV   section in our shop. We guarantee your satisfaction with the choice of just this solution.


With Import Vouchers from CSV you can set up General CSV file settings:


  • setup the char for row delimiter (line)

  • setup the char for col delimiter (elements in line)


And you can set up default voucher settings:


  • setup the default voucher type (discount on order in % / amount, free shipping, etc.)

  • setup the default voucher currency (all currencies in your shop)

  • setup the default voucher value (in % / amount in selected currency)

  • setup the default voucher description (description will be displayed in customer basket)

  • setup the default voucher quantity

  • setup the default voucher quantity per user

  • setup the default value of voucher cumulable (with other voucher codes - true or false)

  • setup the default value of voucher cumulable (with price reductions - true or false)

  • setup the default minimal basket value, from which voucher code will be active

  • setup the default expiry date of voucher code

  • setup the categories to which the discount is to be applied

  • you can upload CSV file into server

  • upload as many CSV files as you want

  • manage uploaded files


And most important:


  • you can upload CSV file into server

  • you can import uploaded CSV file into prestashop voucher database

  • manage colls and rows in CSV file

  • selection of as many CSV file row as you want (row will be added to the database)

  • selection of as many CSV file cols as you want (cols define the voucher specification)


Live preview in back office:


login  :   test@vekia.pl  
Password  :   vouchers


Tutorial of adding many voucher codes in prestashop

In first step you must go to your prestashop back office into the modules section, exactly as shown in the picture:   


In Next step, you can see modules list page. Search module Import Voucher from CSV. If you can't find module try to use search form, type there "Import Voucher". If module exists, click odntooltip cloud with modules full name and icon. (Just like we shown on picture). If module doesnt exists you must to reupload it with module upload form. If you don't have module Import Voucher from CSV, click here to go module product page.


After clicking on tooltip you can click "Configure" to go to the module back office. Modules back office section is a powerful tool for configuring the properties of codes, import files and add codes to your store. Now you can set up the CSV file settings. Type signs of delimiters in your csv file.
In next step configure the voucher properties. Remember that this is not necessary. You can always change these settings, even after loading the file.


Now you can upload CSV file or files (module supports multiple files too) with simple upload form:


after selecting file from disc and click submit, you will see new file in "Uploaded CSV files" section:


Of course you can manage uploaded files. You can delete them in anytime you want. To import voucher codes listed in file you must click "Import to database". After click you will see simple configuration tool, where you can select or deselect vouchers. You can manage columns also. After all you can import vouchers to prestashop database.

Adding voucher codes in prestashop

In the "Vouchers" tab, you can give your customers discounts (by value or by percent) or offer free
shipping on their orders. Under this tab are all of the previously created vouchers, along with their
status of validity.


You can also enable/disable vouchers at the bottom of the screen.

Creating a New Voucher


Vouchers can be created automatically after a product return, but you can create a new voucher at any time manually, and be very specific about its properties.


  • Give it a unique code. You can either create one manually (and therefore use readable words, like 1VOUCH4JOE), or have PrestaShop generate one unique string by clicking the "New" button. Of course, you can also use another string generator (such as random.org's). You can use up to 32 characters.

  • The "Type" field enables you to choose the method of the applied discount:

    • Discount on order (%). The voucher applies to a percentage of the order total. For instance, let's say the order is valued at $200 before taxes. The voucher has a value of -15%. When applying this coupon the customer will only have to pay $170 before taxes.

    • Discount on order (amount). This choice is applied to a monetary discount on the entire order. For instance, let's say the order is valued at $100 before taxes. The discount offers $20 off the purchase. By using the discount the customer pays only $80 before tax.

    • Free shipping. With this discount, you can treat your customers to free shipping. They can use the code when paying and it will apply to their offer.


  • Choose the voucher's behavior – meaning how it should behave when the order's amount is less that the voucher's:

    • reduce the voucher to the total order amount: do this if you want vouchers to be used only once.

    • create a new voucher with the remaining amount: do this if your customers can use their voucher's value for as long as it has some.

    • create a negative invoice: do this if you want vouchers to be used only once, but you still need to know the final value for your accounting book. The user won't receive any kind of further voucher or discount.


  • Give it a proper description, in every languages that your shop supports (click on the flag to change language). Customers will be able to read this, so write a proper sentence.

  • Indicate which categories the voucher applies to – because sometimes you'd rather have customers not use vouchers for certain products.

  • Set a quantity of available vouchers: either "1" if it is intended for a single customer, or any number if the voucher is for whoever uses one first.

  • You can set the number of times a voucher can be used. That number must be at least equal to the quantity of available vouchers.

    • If that number is inferior to the total quantity of available vouchers, then one single customer won't be able to use all of them.

    • Keeping it to "1" makes sure that each of your customers can only the voucher once. In that case, make sure the voucher applies to a group rather than a customer...


  • Set a minimum amount under which the voucher is not applicable. Your voucher will only be applicable if the customer's order is above the given amount.

  • You can choose whether or not the vouchers are allowed to be used with other promotions on your products or other vouchers. Make your preferences known by ticking the checkboxes.

  • The "To be used by" field enables you to restrict your voucher to only one of your customers. For instance, if you had a delivery delay and you want to apologize, you can create a voucher for this customer that only he or she can access. To quickly find the customer, type in the first few letters of their First or Last name in the "Filter" field.

  • The voucher can have a time limit (for instance, a discount for launch week). Click the "From" and "To" fields in order to choose your dates using the calendar. By default, a new voucher lasts a year.

  • You can decide whether the voucher should be shown in the cart summary or not. Do this if you want to inform a customer that they can use a voucher. If you'd rather not push for the voucher's usage, then do not show it.

  • Finally, the "Enable" field allows you to enable or disable the vouchers.


Once everything has been saved, you can send your voucher to your customers.

Your voucher will appear in the "Vouchers" tab, and you can delete or edit it at any time. If the voucher was set to a specific group or customer, then it will appear in the Front-Office, in the customer's "Vouchers" section of his account:


...as well as in the cart (if you chose to), where they can choose which one to apply to their order:


Vouchers that are set to apply to all customers do not appear in these locations: the customer has to know about them in order to use them.

In order to apply the voucher, the customer needs to visit his cart and enter the voucher in the suitable field and click "Add". The customer won't be able to apply the voucher if he checks out immediately.

Once applied, the cart summary displays the voucher's impact on the order's amount:


Read how to import voucher codes from external file

Sunday, September 9, 2012

Prestashop Module Pricing rules by category

Do not waste time to apply a reduced product by product, especially when balances, apply the rule to all products from the same category


Improved module "reduction by categories" to be compatible with v1.4 and higher, and the new pricing rules. Rules can generate reductions of products by category and group.

Pricing rules by category Main Features


Prestashop Module Google +1

Get new customers and improve your ranking by allowing your visitors to recommend your site or products with their friends!

Google+1 for PrestaShop is a button required to:

  • get a better SEO for the friends of your customers'
  • gain the trust of new customers
  • improve your reputation.

By clicking on it, your client shows he likes your site or the products of your catalog, and recommend them.

Then, his contacts have access to this information, and are encouraged to discover your online store with confidence.

Button Google +1 can be can be positioned in the left column, at the top of the product, or at the bottom of the product page.

Google+1 is the better solution to market your online store and extent of your products to friends of your customers'. The ideal way to acquire new customers!


By PrestaShop

The module Google +1 for PrestaShop has been developed by the PrestaShop Team, guaranteeing a full compatibility with PrestaShop e-commerce software.

Google +1 Main Features


Prestashop Module SECUVAD (Lutte contre la fraude)


SECUVAD (Lutte contre la fraude) Main Features


Friday, September 7, 2012

Prestashop Module Sold Items and phone

This module shows on the product page the total number of sold products and contact phone.


Sold Items and phone Main Features

Feature :

  • Shows how many times have bought the product
  • Displays the telephone number to contact
  • Adjusted after which the number of sales to show a block


Block shows how many times have bought the product and contact phone number for communication.


Customers can see that the goods have already bought, it adds confidence to buy, also displayed the phone contact if the customer has any questions.


Installation guide - PrestaShop

Downloading and unzipping the PrestaShop archive


You can download the latest version of PrestaShop at http://www.prestashop.com/en/downloads. This page presents you with an informal form, which helps the PrestaShop team better know its users. Whether you fill the form or not, click the "Download" button to display the download choices.


Three choices are available to you:

  • the latest version (1.4.62 as of this writing): a stable version, ready for all websites.

  • a stable version with a free trial for a PrestaShop partner tool (Store Manager).

  • (at the bottom of the page) the alpha version (1.5.0.3 as of this writing): in heavy development, it is only available for testing purposes, NOT for production. Use at your own risk.


We strongly advise you to stay away from the alpha version if you do not intend to cater for the teething problems inherent to early versions!


Click on either of the stable versions' download buttons, and save the archive on your computer (such as on the desktop). You should get a file named "prestashop_1.4.6.2.zip" (or an equivalent, depending on the version numbers).


The downloaded file is an archive, meaning one file containing all of PrestaShop's files in compressed form. In order to continue with the process, you must uncompress the archive. If your operating system does not natively support Zip files, you can download and install a free tool, such as 7-zip.


Extract the content of the archive to a known location on your hard-drive (such as on the desktop again). Do not upload the Zip file to your server.

Uploading PrestaShop


You should now have a hosting space at your disposal, and a folder on your hard-drive with the uncompressed PrestaShop archive. This step makes you upload the PrestaShop files on your hosting space. This is done using a FTP client.

Installing and configuring your FTP client


FTP is short for "File Transfer Protocol". A great and free FTP client is FileZilla. Download it and install it. Note: do not download FileZilla Server, only FileZilla Client!


Once FileZilla is installed, you will need to configure it with your site's log-in parameters, which should have been sent to you by your host. If not, ask for them to your host – or check your spam folder 

Basically, the needed parameters are:

  • a hostname or an IP address: the location of your hosting space's FTP server.

  • a username: your hosting account identifier, which is unique to you.

  • a password: obligatory security measure.


Open FileZilla, and open its Site Manager tool. You can do this in three different ways:

  • Press Ctrl-S.

  • Click the "Open the Site Manager" icon, at the top left.

  • Open the "File" menu, and select the "Site Manager..." option.


A window opens.


To add your hosting space to the Site Manager:

  1. Click the "New Site" button. A new entry is created in the site list. Give it a recognizable name.

  2. On the right side, in the "General" tab, enter the parameters your host provided you with: host, user, and password. You should not have to change the other default parameters, unless told so by your host.

  3. Once all the fields are properly filled, click the "Connect" button. This will both save your site in the list, and log you into your account, so that you can make sure everything works right.


Uploading your files


Now that you are connected to your hosting space, it is time to transfer the PrestaShop files from your computer to your server.

In FileZilla (or any other FTP client), browse your local folders until you find the one that contains the PrestaShop files. Keep it open.

In the "Remote site" section (on the right), browse to the location where you want PrestaShop to be publicly available (root of the domain, sub-folder, sub-domain...). This can change a lot, depending on both your host and your needs:

  • Your host:

    • Some hosts may require you to place your files in a specific folder, such as /htdocs, /public_html, /web, /www,/yourdomainname.com, etc.

    • Other hosts' FTP server will simply log you directly into the proper upload space.


  • Your needs:

    • If you want your shop to be the main website for your domain name (i.e., http://www.myprestashop.com), upload PrestaShop at the root folder of the upload space (which may depend on the host).

    • If you want your shop to be in a sub-folder of your domain name (http://www.mywebsite.com/shop), you must first create said folder through FileZilla (right-click and choose "Create directory"), then upload PrestaShop in that folder.

    • If you want your shop to be in a sub-domain of your domain name (http://shop.mywebsite.com), you must first create said sub-domain. This depends on your host: you might be able to do it simply by adding a new folder with your FTP client, or you might have to create the sub-domain through your host's administration panel. Read you're hosts support documentation first. Once created, browse to the sub-domain's folder, and upload PrestaShop there.


On FileZilla's left side, you should now have the local folder where you uncompressed the PrestaShop files, and on the right side, the destination location. If you haven't done it yet, uploading is simple: select all files and folders from the local folder (use Ctrl-A), and either drag & drop them to the remote folder, or right-click on the selection and choose "Upload" in the context menu.


After a short while, all of PrestaShop's files and folders should be online. Great!

Creating a database for your shop


Before you can actually install PrestaShop, you need to make sure your MySQL server has a database ready for PrestaShop's data, and if not, create one. This can be done using the free phpMyAdmin tool, which should come pre-installed on your web server most of the time (read you host's documentation). Connect to it using your account credentials, which your host provided you with. It should be accessible through a standard URL, tied to your domain name, or that of your host.


In the left column, you can see the current databases. Some of them should be left alone, because they are either used by phpMyAdmin or by the host:phpmyadmin, mysql, information_schema, performance_schema and others. Read your host's documentation to know if one of these can be used as a default database.

Either way, you can create a brand new database using the central form named "Create new database". Simply enter a unique name, and click "Create". The name of the database will be added to the list on the left. You can now use it to store PrestaShop's data.


Some hosts prefer to have customers use a graphic control panel, such as cPanel, Plesk or a custom-made one. Make sure you read your host's support documentation about handling MySQL databases, and create a database for your shop by following their specific explanations.


Launching the auto-installer


Now comes the part where it all comes together: installing PrestaShop.

The installation process is quite easy, as it is streamlined by PrestaShop's auto-installer. To launch it, simply browse to PrestaShop's location on your hosting: the script will automatically detect that it is not yet installed, and will take you to the auto-installer. From there on, you just have to read and click.

Step 1: Welcome page


This page is a quick intro into the installation process.


  1. Select the language in which you wish the installer to be.

  2. Select whether you wish to install or update PrestaShop (if this is your first time, you can only install).

  3. Read the PrestaShop license (the Open Software License 3.0), and agree to it.


To access the next step, you must check the "I agree to the above terms and conditions" box, then click "Next". If you do not explicitly agree to the license, you cannot install PrestaShop.

Step 2 & 3: System compatibility & system configuration.


The second page makes a quick check of all the server parameters on your host, and if nothing wrong is found, takes you directly to the third step.
System compatibility

This page checks that everything is OK with your server configuration: PHP settings, permissions on files and folders.


If anything goes wrong, the installer stops you here, enabling you to see the few technical details that need fixing, be it changing the PHP configuration or updating the file permissions.

While changing the PHP configuration can only be done on a case-by-case basis depending on your level of access to your server, and therefore cannot be explained here, updating the file permissions is easier to explain. This will require you to access your remote files, and therefore use your FTP client (such as FileZilla).

Log-in to your server account using your FTP client, browse to the PrestaShop folder, and find the folders that are marked by the installer as in need of a permission change.


CHMOD
Changing file/folder permission on a Unix/Linux system is called a "CHMOD", after the command of the same name – you can find an explanation of file permissions here). Giving them "write permission" is called "doing a CHMOD 755" or "a CHMOD 775", depending on the host.


Some hosts might require you to use CHMOD 777, although it is not recommended for anything more than a one-time need.
If you have to use CHMOD 777 in order to install PrestaShop, make sure to switch to a safer setting (775, 755 or even 644) once you are done installing.


In any case, thanks to FileZilla (and most FTP clients), you can change permissions easily and graphically: once you have found a file or folder that needs such a change, right-click on it from your FTP client, and in the context menu choose "File permissions...". It will open a small window.


Depending on your server configuration (which you don't always have a hand at), you'll need to both "Read" and "Execute" columns of boxes checked, and at least the "Owner" and "Group" rows for the "Write" column. Some host might require you to have the public "Write" box checked, but be careful with that: have anyone be able to edit the content of your folder is rarely a good thing.

For folders that the installer is needing a recursive permission change on, you can check the "Recurse in subdirectories" box.

Regularly check that you have made the correct check by relaunching the installer's compatibility checks: click "Refresh these settings" as often as necessary.

Once all indicators are green, you can click "Next". If you cannot have them all green, at least make sure the installer displays "Your configuration is valid, click next to continue!"
System configuration

This page contains a form that enables you to tell PrestaShop where the database server is, and which database it should use, along with a few other details.


Database configuration

Fill all the fields with the connection information provided by your web-host, along with the name of the database you chose/created for PrestaShop, then click the "Verify now!" button in order to check that everything is fine. If so, the installer will display the following message: "Database is connected".

Choose the prefix for your tables. "ps_" is the default, resulting in the PrestaShop SQL table having names such as "ps_cart" or "ps_wishlist"; but if you need to install more than one instances of PrestaShop on the same database, then you must use a unique prefix for each install.
Installation type

Two modes are available:

  • Simple mode: a blank and empty PrestaShop will be installed. It will have no modules, no theme, and no demo products/categories: you will have to build it all yourself. This is great if you know what you are doing.

  • Full mode: PrestaShop will be installed with a theme, more than a hundred modules, and some demo products and categories. This is great for newcomers, as it helps you learn how to use PrestaShop... and can of course server as a good basis for your own store, after removing the demo products and categories!


E-mail delivery set-up

PrestaShop relies heavily on e-mail for notifications, both for the shop owner and its customers. This form enables you to test whether the current server configuration lets you send e-mail using PHP's mail() function. If this is not the case, then check the "Configure SMTP manually" box in order to configure your own mail server. Note that this is reserved to advanced users.

Click "Next", and the installer will start filling the database with tables and data. This might take a few minutes in the slower server.

Step 3: Shop configuration


This is where you can already start customizing your shop: give it a name and a logo, indicate its main activity, and indicate the personal information for the shop owner (which has legal binding in most countries)...


Note that the logo will appear:

  • On all of your store's pages.

  • In your back-office.

  • In all of the e-mails sent to your customers.

  • In all of your contract documents (bills, return authorizations, etc.)


It is highly recommended to not keep the default PrestaShop logo, for obvious reasons.

You can also choose to use PrestaShop simply as catalog, which will disable all purchase and payment features, even if temporarily. This is useful when you are setting your shop up for first time, as it insures that no purchase can be made until you are ready to let people shop on your site. You can remove the catalog mode later, in the "Preferences" > "Products" sub-tab.

The page ends with a couple of "Additional benefits", which are modules that are specially promoted in the installer. You can choose to install them or not.

Click "Next": your shop is online!

Completing the installation


As you can read about right on the final page of the installation process, there are a couple of last actions to perform before you can call it a success.


An easy way to improve your installation's security is to delete or rename some key files and folders. This is done using your FTP client, directly on the server.

Items to delete:

  • "install" folder.

  • "readme_*" files (5 of them).

  • "CHANGELOG" file.


Item to rename:

  • "admin" folder: you should give it a unique name, so that no attacker can access your admin files. For instance, "admin42", "secretFolder" or "xyz123" – anything unique.


Write down the new name for your admin folder, as you will from now on access it directly.

Congratulations! Installation is now complete.

Log in to the PrestaShop back-office and start filling out your products catalog and configuring the many settings to suit your tastes and needs.

Finally, in order to close all potential doors, use your FTP client to update the files and folders permissions to 664, or 666 if your host requires it. If it turns out low access rights prevent some modules to work, you should set permissions back to 755.


Regularly back up your database, ideally on different computers, in case of problems related to hardware or security.

Adding voucher in PrestaShop

1) Login Into your prestashop back office


Prestashop Back office, source: prestashop user guide

2) Go to payment section and Vouchers subsection


"In the "Vouchers" tab, you can give your customers discounts (by value or by percent) or offer free shipping on their orders. Under this tab are all of the previously created vouchers, along with their status of validity." Source: Prestashop User Guide

You will see something like that:


That is a list of voucher codes already defined in your shop. For first, check the Enable Vouchers, it must be set to Yes. If you want to turn off voucher codes in your shop, set this option to "No" :)


3) Adding a voucher code into your shop


For add new voucher, click "+ Add new" button.

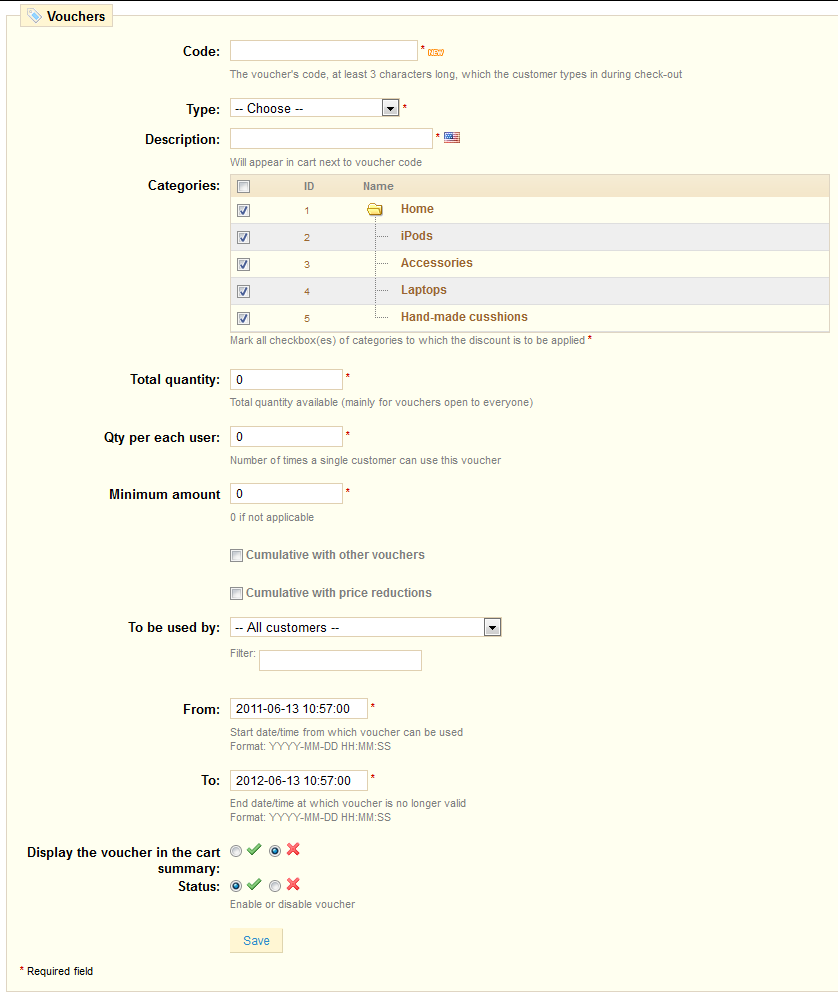
you will see something like that:


  • Give it a unique code. You can either create one manually (and therefore use readable words, like 1VOUCH4JOE), or have PrestaShop generate one unique string by clicking the "New" button. Of course, you can also use another string generator (such as random.org's). You can use up to 32 characters.

  • The "Type" field enables you to choose the method of the applied discount:

    • Discount on order (%). The voucher applies to a percentage of the order total. For instance, let's say the order is valued at $200 before taxes. The voucher has a value of -15%. When applying this coupon the customer will only have to pay $170 before taxes.

    • Discount on order (amount). This choice is applied to a monetary discount on the entire order. For instance, let's say the order is valued at $100 before taxes. The discount offers $20 off the purchase. By using the discount the customer pays only $80 before tax.

    • Free shipping. With this discount, you can treat your customers to free shipping. They can use the code when paying and it will apply to their offer.


  • Choose the voucher's behavior – meaning how it should behave when the order's amount is less that the voucher's:

    • reduce the voucher to the total order amount: do this if you want vouchers to be used only once.

    • create a new voucher with the remaining amount: do this if your customers can use their voucher's value for as long as it has some.

    • create a negative invoice: do this if you want vouchers to be used only once, but you still need to know the final value for your accounting book. The user won't receive any kind of further voucher or discount.


  • Give it a proper description, in every languages that your shop supports (click on the flag to change language). Customers will be able to read this, so write a proper sentence.

  • Indicate which categories the voucher applies to – because sometimes you'd rather have customers not use vouchers for certain products.

  • Set a quantity of available vouchers: either "1" if it is intended for a single customer, or any number if the voucher is for whoever uses one first.

  • You can set the number of times a voucher can be used. That number must be at least equal to the quantity of available vouchers.

    • If that number is inferior to the total quantity of available vouchers, then one single customer won't be able to use all of them.

    • Keeping it to "1" makes sure that each of your customers can only the voucher once. In that case, make sure the voucher applies to a group rather than a customer...


  • Set a minimum amount under which the voucher is not applicable. Your voucher will only be applicable if the customer's order is above the given amount.

  • You can choose whether or not the vouchers are allowed to be used with other promotions on your products or other vouchers. Make your preferences known by ticking the checkboxes.

  • The "To be used by" field enables you to restrict your voucher to only one of your customers. For instance, if you had a delivery delay and you want to apologize, you can create a voucher for this customer that only he or she can access. To quickly find the customer, type in the first few letters of their First or Last name in the "Filter" field.

  • The voucher can have a time limit (for instance, a discount for launch week). Click the "From" and "To" fields in order to choose your dates using the calendar. By default, a new voucher lasts a year.

  • You can decide whether the voucher should be shown in the cart summary or not. Do this if you want to inform a customer that they can use a voucher. If you'd rather not push for the voucher's usage, then do not show it.

  • Finally, the "Enable" field allows you to enable or disable the vouchers.


Once everything has been saved, you can send your voucher to your customers.


As you see, adding new voucher into your shop is very simple but it takes a lot of time...


Reset Prestashop admin password

Reset Prestashop admin password

If you dont remeber your Prestashop admin password and you are still trying to log in into Prestashop back office without effects. This short paper is exactly for you. With this article you will know how to reset your Prestashop admin password. Read this step by step tutorial for reset Prestashop password.

1. Log in into your FTP account

For reset prestashop password you must be able to log in into your Prestashop FTP account. That's important because you'll need access to one file in Prestashop directory described in next step.

2. Check config/settings.inc.php file

Look in config/settings.inc.php file in your Prestashop directory and find out the _COOKIE_KEY_ value. This value in IT nomencalture is called as salt.

3. Log in into your PhpMyAdmin

You must have access to PhpMyAdmin or other database managment system. If you're logged in, try to run the following SQL code and replace the <> variables with values:

<_COOKIE_KEY_> that is salt value from config/settings.inc.php file described in step 2

<yourNewPassword> that is your new password value

<youremailaddress> that is your administrator email address, probably yours ;)

UPDATE employee SET passwd = md5(“<_COOKIE_KEY_ value><yourNewPassword>”) WHERE email = “<youremailaddress>”;


 This article is copied from: How to reset PrestaShop admin password

Monday, September 3, 2012

Prestashop Module M4 Vouchers for friends

The module encourages customers to deal vouchers to friends. For each voucher gets applied in the purchase of a customer who offered a voucher to their friends, also attributed to the discount.


Administration

The parameters of automatically generated vouchers are set in BackOffice for the customer and his friends, and an image for the ad slot. Under this scheme will be based created vouchers. A pair of vouchers, the customer creates can be viewed in the administration of vouchers.  Both vouchers can be manually disabled or deleted.


User account

The customer has in their account the page  for vouchers for friends and track their status. If a friend uses the voucher and make an order, then after changing its status to "Shipped", the amount will be added to the customer's voucher.

If customers would use the voucher in its own order, then it will not be attributed to additional discount. Multiple change in order to "Shipped" has no effect on the amount of customer rebates. If a friend returns goods, customer is reduced discount for the voucher. There will be created a new voucher with a different code after applying the voucher by the customer.


Shop
Optionally, you can view the ad block to draw attention to offer vouchers for friends.

M4 Vouchers for friends Main Features


Prestashop Module Cdiscount.com import

This module allows you to import the products from CDiscount.com in your shop to sell their products by Dropshipping. 


Cdiscount.com import Main Features


Imported datas :

  • Name,
  • Description,
  • Image
  • Category,
  • The manufacturer,
  • The purchase price,
  • environmental tax,
  • EAN,
  • Weight.

Prices management:

  • Financial margins to be applied depending on the purchase price as a percentage or amount,
  • The tax rule applied to imported products,
  • The shipping cost to add to the product price or in the field "additional shipping cost"

Product management :

  • Whether to update the products already imported, 
  • update descriptions, 
  • update product images, 
  • update categories,
  • Whether to remove or desactivate products that are no longer present in the import file.

Category management :

  • Create categories images automaticaly 
  • Remove duplicate categories 
  • Select which categories to import
  • Set a mapping between your categories and the ones of CDiscount

Manufacturer management :

  • Add manufacturer name before product name
  • Select which manufacturer to import
  • Set a mapping between your manufacturers and the ones of CDiscount


Add to your catalog of over 20,000 references at the best prices and sell them without constraints.

Sell without inventory and manage shipments without:

  • you set a margin that you want to receive on the sale of  CDiscount products 
  • you sell products
  • and CDiscount handles shipping of orders.


Saturday, September 1, 2012

Prestashop Module Google plus one button

What does the Google Plus 1 (+1) button do? Essentially, Google Plus One button is a rival to Facebook’s LIKE button but characterized as a slightly different function. Basically, the Google Plus One button recommendations will be shared with the context of relevant searches and eventually influence rankings of sites within Google search queries.


If you visitor click google +1 button on a product page (or some other page), the next time people searches for this product there’s a good chance they’ll see this page, with a little icon beside it indicating you recommend the link.
So that way you'll get more visitors from Google.


Feature

  • Select google +1 button style
  • Select lanugage
  • Select automatic language detection
  • Select google + 1 button position: left column, right column, header, footer, home page or extra left (after product photo)
  • Set page url
  • Select automatic page url detection


Demonstration:

http://demo.blmodules.com/
http://demo.blmodules.com/admin1/
login: demo@blmodules.com
pass: demo1234

Google plus one button Main Features


Prestashop Module Products Planification

Prepare your sale campaigns right now with Products Planification.
By using this module, you can plan your discount, your sales, and your product's activation or disabling.


Products Planification Main Features

Creation and management of product's group for massive actions.
Product state switching (Activated / Disabled).
Display "On Sale" icon.
Discount appliance (percentage or currency).
Specific Prices management by country, currency and customer groups.
Start and end date mangement (or illimited time).
Restriction by countries, currencies and customer groups.
CRON Task for better performances.


With the new possibility to define start date and end date for your campaigns, it has never been that simple to automate your sales, or you series management!


Each of your campaigns can be started whenever you want.
These campaigns are allowing you to apply discounts with restriction management by countries, currencies and customer groups.


At the end of your campaigns, assigned product's prices will be restored to there initial state.


Prestashop Module 1-Click Upgrade - AutoUpgrade

Provides an automated method to upgrade your shop to the last PrestaShop version. Caution : This module requires right of writing in your prestashop directory. Custom theme are not updated.


1-Click Upgrade - AutoUpgrade Main Features

Warning, this module requires write permission in your root directory. Your custom template will not be updated.


Update your PrestaShop online store has never been easier!


With this module:

  • Upgrade your shop with one click, with the new version of PrestaShop;
  • After you have updated your online store, you can restore the previous version. Use this feature if your theme or an essential module (not native) was not working properly;
  • Back up your files and visuals;
  • Compare the differences between the two versions of PrestaShop;
  • Take advantage of options to keep your original PrestaShop theme, keep the old templates of mails in addition to the new ones, or to disable the custom modules.


Enjoy the benefits of version 1.5 of PrestaShop in one click with this module that allows you to update easily your online store!